Thursday, August 01, 2013

Android Tip: Handling Events in a Fragment

In an activity, handling the Click event of a Button is very easy using the android:onClick attribute and assigning it a method name as the event handler. You then implement the method in your activity. However, if you have a Button in a fragment, using the android:onClick attribute does not cause the event handler to fire in the Fragment class; instead it will fire in the Activity class.

In the spirit of loose coupling in Software Engineering, a better way is to handle the Click event of your button in the fragment directly in the Fragment class.

Assuming in your XML file (activity_detail.xml) for your fragment you have a Button with an id of:

    <Button
       android:id="@+id/button1"
        android:layout_width="wrap_content"
        android:layout_height="wrap_content"
        android:layout_alignParentLeft="true"
        android:layout_alignParentRight="true"
        android:text="OK" />

In your Fragment Java class, you need to have the following to handle the Button's click event:

public class DetailFragment extends Fragment 
    implements OnClickListener 
{
    Button btn;

    @Override
    public View onCreateView(LayoutInflater inflater,
    ViewGroup container, Bundle savedInstanceState)
    {
        View view = inflater.inflate(
            R.layout.activity_detail, container, false);
        
        btn = (Button) view.findViewById(R.id.button1);
        btn.setOnClickListener(this);       

        return view;
    }

    @Override
    public void onClick(View v) {
        Toast.makeText(this.getActivity(), 
            "Button is clicked!", Toast.LENGTH_LONG).show();

    }

Sunday, July 21, 2013

Windows Phone Tip: Using Schemes to Launch Settings Pages

Due to security reasons, your Windows Phone application is not allowed to modify some of the device’s settings directly. For example, you might want to programmatically turn on the airplane mode on the device. However, this is not allowed without the user’s explicit permission. The only way to turn on airplane mode is for the user to navigate to the Settings’s Airplane Mode page and turn it on manually.

In your application, instead of asking the user to navigate to the Settings page, you can directly bring them to the page, programmatically.

To launch the various Settings pages, you can use the Launcher class with the LaunchUriAsync() method. As you are launching the pages asynchronously, you need to wrap these calls in a async method, like this:

        private async void LaunchSettings(int mode)
        {
            switch (mode)
            {
                case 0: await Launcher.LaunchUriAsync(
                    new Uri("ms-settings-airplanemode:"));
                    break;
                case 1: await Launcher.LaunchUriAsync(
                    new Uri("ms-settings-bluetooth:"));
                    break;
                case 2: await Launcher.LaunchUriAsync(
                    new Uri("ms-settings-cellular:"));
                    break;
                case 3: await Launcher.LaunchUriAsync(
                    new Uri("ms-settings-wifi:"));
                    break;
                case 4: await Launcher.LaunchUriAsync(
                    new Uri("ms-settings-location:"));
                    break;
                case 5: await Launcher.LaunchUriAsync(
                    new Uri("ms-settings-emailandaccounts:"));
                    break;
                case 6: await Launcher.LaunchUriAsync(
                    new Uri("ms-settings-lock:"));
                    break;
            }
        }


The following figure shows the Airplane Mode settings page:

Friday, July 19, 2013

Xamarin.iOS Tip - Copy File in Bundle to Documents Folder

Very often, you need to attach resources to your application so that you can use them during runtime. For example, you might have an empty database created during development time that you want to use to store the locations coordinates collected when the user is using your application. In order to use that database, when the application is first run on the device, you need to copy it from the application bundle onto the application’s Documents folder.

The following method allows you to specify a file to copy from the application bundle onto the application’s Documents folder:

        private void CopyFileInBundleToDocumentsFolder(
        String filename)
        {
            //---path to Documents folder---
            var documentsFolderPath =
                Environment.GetFolderPath(
                    Environment.SpecialFolder.MyDocuments);

            //---destination path for file in the Documents
            // folder---
            var destinationPath =
                Path.Combine(documentsFolderPath, filename);

            //---path of source file---
            var sourcePath = 
                Path.Combine(NSBundle.MainBundle.BundlePath,
                filename);

            //---print for verfications---
            Console.WriteLine(destinationPath);
            Console.WriteLine(sourcePath);

            try {
                //---copy only if file does not exist---
                if (!File.Exists(destinationPath))
                {
                    File.Copy(sourcePath, destinationPath);
                }  else {
                    Console.WriteLine("File already exists");
                }
            }  catch (Exception e) {
                Console.WriteLine(e.Message);
            }
        }

You typically call this method when the application is first launched:

        public override bool FinishedLaunching (
        UIApplication app, NSDictionary options)
        {
            window = new UIWindow
                (UIScreen.MainScreen.Bounds);
           
            viewController = new
                BundledResourcesViewController ();
            window.RootViewController = viewController;
            window.MakeKeyAndVisible ();

            //---copy file in bundle to documents folder---
            CopyFileInBundleToDocumentsFolder("MyDB.sql");

            return true;

        }

Windows Phone Tip: Checking Network Availability

If you are writing networked applications, it is always important to be able to know if the device has network connectivity. In addition, it is also very useful to know if the device is connected to the WiFi, or the cellular data network. If the device is connected to the cellular data network, you could limit the amount of data transferred as this could cost impose additional cost on the user.  

All the code in this tip and tricks uses the following namespaces, so ensure that you import them into your page:

using Windows.Networking.Connectivity;
using System.Diagnostics;
using System.Runtime.Serialization.Json;
using System.Runtime.Serialization;
using Microsoft.Phone.Net.NetworkInformation;
using Windows.System.Threading;
using System.Threading.Tasks;

To know if there is network connectivity on your device, use the GetIsNetworkAvailable() method from the NetworkInterface class:

    if (NetworkInterface.GetIsNetworkAvailable()){

    }

This method returns a boolean value indicating if there is any form of network connectivity on your device.

To know what kind of connectivity you have, you can access the NetworkInterfaceType property of the NetworkInterface class:

        private NetworkInterfaceType GetNetworkInterfaceType()
        {
            //---this is a blocking call---
            var interfaceType =
                NetworkInterface.NetworkInterfaceType;
            return interfaceType;
        }

However, do take note that the NetworkInterfaceType property is a blocking call – it typically takes about a couple of seconds to return you the network type. Hence, be sure not to call it directly. Instead, you should put it into a method and call it asynchronously using the async and await keywords:

        private async void CheckNetworkType()
        {
            //---call the GetNetworkInterfaceType() method
            // asynchronously---
            var interfaceType = await
                Task.Run(() =>
                    GetNetworkInterfaceType()
                );
        }

You can check the type of connectivity you have by comparing the interface type with the enumerations in the NetworkInterfaceType:

        private async void CheckNetworkType()
        {
            //---call the GetNetworkInterfaceType() method
            // asynchronously---
            var interfaceType = await
                Task.Run(() =>
                    GetNetworkInterfaceType()
                );

            if (interfaceType ==
            NetworkInterfaceType.Wireless80211)
            {
                Debug.WriteLine("Wireless");
                GetMyIPAddress();
                GetMyPublicIPAddress();
            }
            else if (interfaceType ==
            NetworkInterfaceType.MobileBroadbandGsm ||
            interfaceType ==
            NetworkInterfaceType.MobileBroadbandCdma)
            {
                Debug.WriteLine("Cellular network");
                GetMyIPAddress();               
            }
            else if (interfaceType ==
            NetworkInterfaceType.None)
            {
                Debug.WriteLine("None");
            }
        }

You can get your IP address by using the following method:

        public void GetMyIPAddress()
        {
            var hostNames = NetworkInformation.GetHostNames();
            foreach (var hostName in hostNames)
            {
                if (hostName.IPInformation != null)
                {
                    string ipAddress = hostName.DisplayName;
                    Debug.WriteLine("IP address: " +
                        ipAddress);
                }
            }
        }

If you are connected to a WiFi, it is often that your IP address is a local one – one that that the router assigns to you using DHCP. If you want to know the IP address that your service provider assigns to your router, you can use a JSON service located at  http://ip.jsontest.com/. This service will return you the IP address that is assigned to your router by your service provider.

To use this service, first define a class called Json_Result:

    [DataContract]
    public class Json_Result
    {
        [DataMember(Name = "ip")]
        public string IP { get; set; }
    }

You can call the JSON service using the WebClient class, like the following code snippet:

        private void GetMyPublicIPAddress()
        {
            //---find my public ip address---
            WebClient client = new WebClient();
            client.OpenReadCompleted +=
                client_OpenReadCompleted;
            client.OpenReadAsync(new
                Uri("http://ip.jsontest.com/"),
                UriKind.Absolute);
            //---returning result is
            //    {"ip":"xxx.xxx.xxx.xxx"}---
        }

        void client_OpenReadCompleted(object sender,
        OpenReadCompletedEventArgs e)
        {
            var serializer = new
                DataContractJsonSerializer(
                    typeof(Json_Result));
            Json_Result ipResult =
                (Json_Result)serializer.ReadObject(e.Result);           
            Debug.WriteLine("My public IP address: " +
                ipResult.IP);
        }

The above code snippet is also useful in helping you determine if you have actual Internet access. Having network connectivity does not mean you have Internet connectivity - hence if the above code is able to fetch your IP address, it means that you have Internet connectivity.

Finally, if you want to programmatically monitor for changes to network connectivity on your device, you can set an event handler for the NetworkAvailabilityChanged event:

//---monitor for changes in network availability---            DeviceNetworkInformation.NetworkAvailabilityChanged +=
    DeviceNetworkInformation_NetworkAvailabilityChanged;

void DeviceNetworkInformation_NetworkAvailabilityChanged(
object sender, NetworkNotificationEventArgs e)
{
    CheckNetworkType();
}

Full Code Listing

using System;
using System.Collections.Generic;
using System.Linq;
using System.Net;
using System.Windows;
using System.Windows.Controls;
using System.Windows.Navigation;
using Microsoft.Phone.Controls;
using Microsoft.Phone.Shell;
using MyIPAddress.Resources;

using Windows.Networking.Connectivity;
using System.Diagnostics;
using System.Runtime.Serialization.Json;
using System.Runtime.Serialization;
using Microsoft.Phone.Net.NetworkInformation;
using Windows.System.Threading;
using System.Threading.Tasks;

namespace MyIPAddress
{
    [DataContract]
    public class Json_Result
    {
        [DataMember(Name = "ip")]
        public string IP { get; set; }
    }

    public partial class MainPage : PhoneApplicationPage
    {
        // Constructor
        public MainPage()
        {
            InitializeComponent();

            //---monitor for changes in network
            // availability---                         DeviceNetworkInformation.NetworkAvailabilityChanged +=            DeviceNetworkInformation_NetworkAvailabilityChanged;

            if (NetworkInterface.GetIsNetworkAvailable())
            {
                CheckNetworkType();
            }
            else
            {
                Debug.WriteLine("No network available");
            }                  
        }

        private async void CheckNetworkType()
        {
            //---call the GetNetworkInterfaceType() method
            // asynchronously---
            var interfaceType = await
                Task.Run(() =>
                    GetNetworkInterfaceType()
                );

            if (interfaceType ==
            NetworkInterfaceType.Wireless80211)
            {
                Debug.WriteLine("Wireless");
                GetMyIPAddress();
                GetMyPublicIPAddress();
            }
            else if (interfaceType ==
            NetworkInterfaceType.MobileBroadbandGsm ||
            interfaceType ==
            NetworkInterfaceType.MobileBroadbandCdma)
            {
                Debug.WriteLine("Cellular network");
                GetMyIPAddress();               
            }
            else if (interfaceType ==
            NetworkInterfaceType.None)
            {
                Debug.WriteLine("None");
            }
        }

        void       
        DeviceNetworkInformation_NetworkAvailabilityChanged(
        object sender, NetworkNotificationEventArgs e)
        {
            CheckNetworkType();
        }

        private NetworkInterfaceType GetNetworkInterfaceType()
        {
            //---this is a blocking call---
            var interfaceType =
                NetworkInterface.NetworkInterfaceType;
            return interfaceType;
        }
       
        private void GetMyPublicIPAddress()
        {
            //---find my public ip address---
            WebClient client = new WebClient();
            client.OpenReadCompleted +=
                client_OpenReadCompleted;
            client.OpenReadAsync(new
                Uri("http://ip.jsontest.com/"),
                UriKind.Absolute);
            //---returning result is
            //    {"ip":"xxx.xxx.xxx.xxx"}---
        }

        public void GetMyIPAddress()
        {
            var hostNames = NetworkInformation.GetHostNames();
            foreach (var hostName in hostNames)
            {
                if (hostName.IPInformation != null)
                {
                    string ipAddress = hostName.DisplayName;
                    Debug.WriteLine("IP address: " +
                        ipAddress);
                }
            }
        }
       
        void client_OpenReadCompleted(object sender,
        OpenReadCompletedEventArgs e)
        {
            var serializer = new
                DataContractJsonSerializer(
                    typeof(Json_Result));
            Json_Result ipResult =
                (Json_Result)serializer.ReadObject(e.Result);           
            Debug.WriteLine("My public IP address: " +
                ipResult.IP);
        }
    }

}

Sunday, July 14, 2013

Windows Phone Tip: Getting the Device GUID

Sometime you may want to uniquely identify a Windows Phone, such as when you are implementing push notifications. The best way to identify a unique Windows Phone is through its device GUID.

The following code snippet shows how to obtain the GUID of a Windows Phone device:

using Microsoft.Phone.Info;

    public static byte[] DeviceId()
    {
        object uniqueId;
        if (DeviceExtendedProperties.TryGetValue(
        "DeviceUniqueId", out uniqueId))
        {
            return (byte[])uniqueId;
        }
        return null;
    }
    ...
    ...

    byte[] guid = DeviceId();           
    MessageBox.Show("Device GUID - " +

        Convert.ToBase64String(guid));

For the code above to work, you need to check the ID_CAP_IDENTITY_DEVICE setting in your WMAppManifest.xml file.

Friday, July 12, 2013

Windows Phone Tip: Updating the UI from an Asynchronous Thread

One of the most common tasks you need to perform in a Windows Phone application is updating the UI from a separate thread. For example, you may be download some content asynchronously using a WebClient class and when the operation is completed, you want to update the UI with the content that was downloaded. Updating the UI directly from an asynchronous thread is not allowed, as UI controls are not thread-safe.  

The easiest way to update the UI from an asynchronous thread is to use the Dispatcher class. To determine if you can update an UI directly, you can use the CheckAccess() method. If this method returns a true, it means you can directly update the UI. Else, you have to use the BeginInvoke() method of the Dispatcher class to update the UI in a thread-safe manner. The following code snippet makes this clear:

    if (Dispatcher.CheckAccess() == false)
    {
        //---you have to update the UI through the
        // BeginInvoke() method---
        Dispatcher.BeginInvoke(() =>
            txtStatus.Text = "Something happened..."
        );
    }
    else
    {
        //---you can update the UI directly---
        txtStatus.Text = "Something happened..."
    }

If you have more than one statement to perform in the BeginInvoke() method, you can group them into a method and call it like this:


        private void UpdateUI(String text)
        {
            txtStatus.Text = text;
            btnLogin.Content = text;
        }
        ...
        ...

            Dispatcher.BeginInvoke(() =>
                UpdateUI("Something happened...")

            );

Thursday, July 11, 2013

Windows Phone Tip: Check if App is Running on Emulator

There are times where you want to check if your app is running on the emulator. For example, Bluetooth functionality can only be tested on a real device. Hence, in your code you could check to see if the app is running on an emulator. If it is, then terminate the app.

The following code snippet checks for the current device type. If it is running on an emulator, terminate the app:

//---check if your app is running on the emulator---
if (Microsoft.Devices.Environment.DeviceType ==
    Microsoft.Devices.DeviceType.Emulator)
{
    MessageBox.Show("Running on emulator!");
    //---terminate the app---
    App.Current.Terminate();
}

Course Highlight - Windows Phone 8


While Microsoft may not be winning the smartphone platform war today, it is slowly making inroads into the various markets previously dominated by iPhone and Android. Today's biggest news - Russia's largest wireless carrier has just dropped support for iPhone in favor of Windows Phone.

Inline image 1
In the smartphone war, apps play a pivotal role in determining the success or failure of a platform. While the quantity and quality of the apps in the Windows Phone Store are still no match to its competitors, it is slowly but surely attracting top app makers into making apps for it. Just this week, Viber has updated its Windows Phone app that is specifically designed for Windows Phone devices. 

Good News for Windows Phone Developers (or wannabe)!
For a limited time, the annual subscription fee for a Windows Phone Dev Center account has been reduced to $19 USD (or the equivalent in your local currency). Taxes, VAT, and other fees are excluded from this offer. This offer is valid beginning 6/26/2013 12:00 AM PST and ending 8/27/2013 12:00 AM PST in countries where the Windows Phone Dev Center registration is available (see Regional info). See the official terms of this offer for more details.

In Singapore, the reduced fee is now S$30. Go and register now!

Confirmed Windows Phone 8 Programming Courses This Month
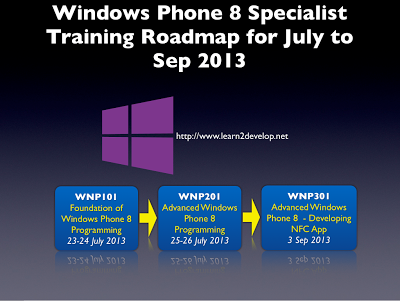
In July, we have two confirmed courses for Windows Phone 8 development - Foundation of Windows Phone 8 Programming, and Advanced Windows Phone 8 Programming. In Sep, we have a brand new course on Windows Phone 8 NFC Programming. So, brush the dust off your Windows laptop and start your engine! 

Inline image 1

In the Foundation course, you will learn the basics of writing Windows Phone app - User Interfaces, choosers and launchers, states of an application, location-based services, file storage, web services, databases, maps, and more. 

In the Advanced course, you will dive deeper into the more advanced areas of Windows Phone programming - background agents, Bluetooth and sockets programming, security, push notifications, and more.

Windows Phone Challenge - Lumia 920 and Lumia 925
Microsoft Singapore and Nokia Singapore are teaming up for the next Windows Phone Challenge! All you need to do is to implement one (or more) of the challenges posted here and you will be able to win some cool Nokia Lumia devices. The challenges are applications based very much on the local (Singapore) context. This is a great idea for student projects and is a good time to put your knowledge to the test.

Inline image 2